One of the reasons we moved to Seattle in July, 2022 was to have more opportunities to contribute in building a community while living more sustainably. Anyone visiting Seattle even briefly would notice that there’s trash just everywhere. Shortly after moving here I started volunteering both by myself and with a few other groups such as Seattle Street Fixers cleaning up around Seattle.
My main focus has been in three basic areas:
- Pedestrian accessibility and safety.
- Bicycle, scooter, wheelchair, and other wheeled vehicle accessibility.
- Environmental harm reduction.
Car infrastructure gets plenty of attention and funding, and I don’t care to contribute there, with the exception of the last point. I will pick up litter from car lanes and gutters to avoid it ending up in our waterways (or ending up on pedestrian or bike infrastructure).
Most of my work is in a few areas:
- Cleaning up litter and hazards (e.g. broken glass, metal, etc.) on and around pedestrian and bike infrastructure.
- Removing plant overgrowth and plant litter on and around pedestrian and bike infrastructure.
- Cleaning up litter to keep it from migrating further into the environment and to improve the aesthetics of the city.
I have no interest in “cleaning up” the city by removing or harassing unhoused people, or otherwise “beautifying” the city by harming vulnerable people.
Sign up for Adopt-a-Street

The first step you’ll want to take is probably to sign up for Seattle Public Utilities (SPU) Adopt-a-Street program. SPU will provide most supplies you need for litter pickup, including bright yellow “Community Cleanup” trash bags, compost/leaf bags, trash grabbers, leaf grabbers, sharps containers, gloves, and vests. Most importantly though, they will pick up the collected trash and dispose of it at no cost. For most people, the cost of trash disposal in Seattle would make doing this as a volunteer infeasibly expensive. However if you’re working by bike, it would also be difficult to transport the heavy trash all the way to a transfer station, anyway. You don’t really have to “adopt” any particular street to participate in the program, but when you sign up you can mark your home street or similar.
Build and outfit a work-by-bike rig
I am going to list everything that I personally use for cleanup work, although I don’t bring everything every time. You should, of course, decide what kind of work you’d like to do; not everything here is required for most cleanup work. For any group cleanup, I usually bring pretty much everything I have and loan out tools and supplies to anyone who needs them.

This section is very work-by-bike centric, but most of this advice applies to anyone working by car or otherwise as well. Consider working by bike if you can, though. Sidewalks, bike lanes, trails, and other places are much more accessible by bike, and you can keep your tools and supplies much closer to where you’re working that way. It’s ideal!
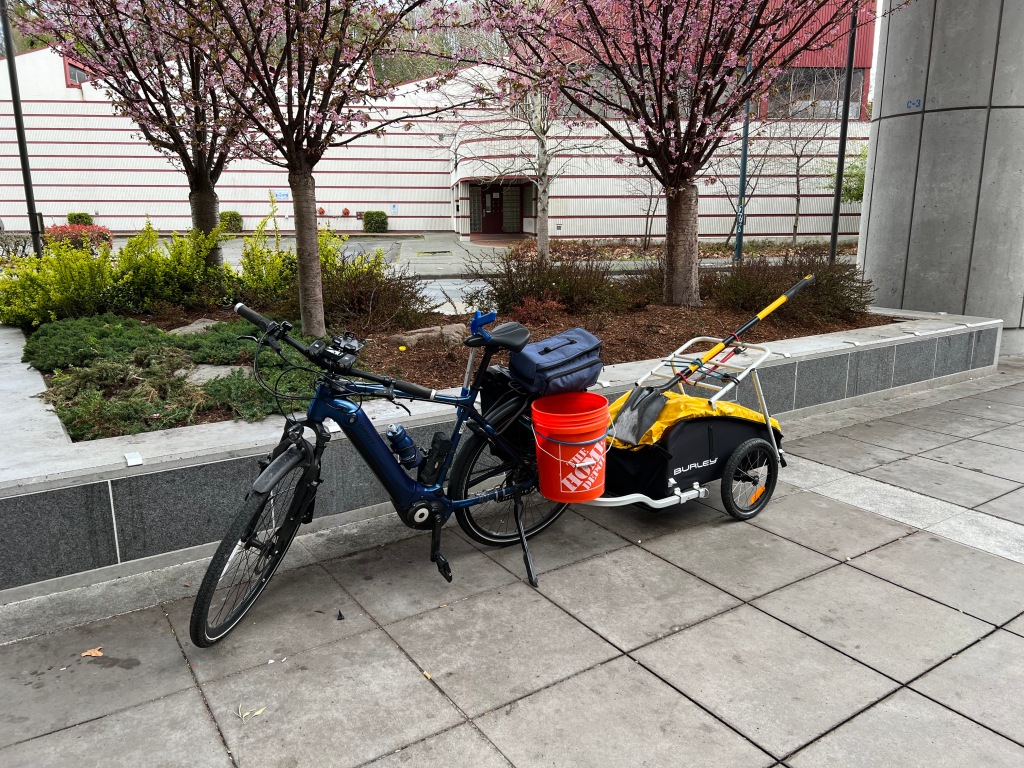
Giant Explore E+ e-bike
The bike is by far the most expensive, and most personal component of the rig. I have a 2022 Giant Explore E+ e-bike, and I think it’s a good fit for this purpose. An electric bike of any sort is very helpful (and maybe even required) for getting around Seattle with a trailer loaded with tools or trash.
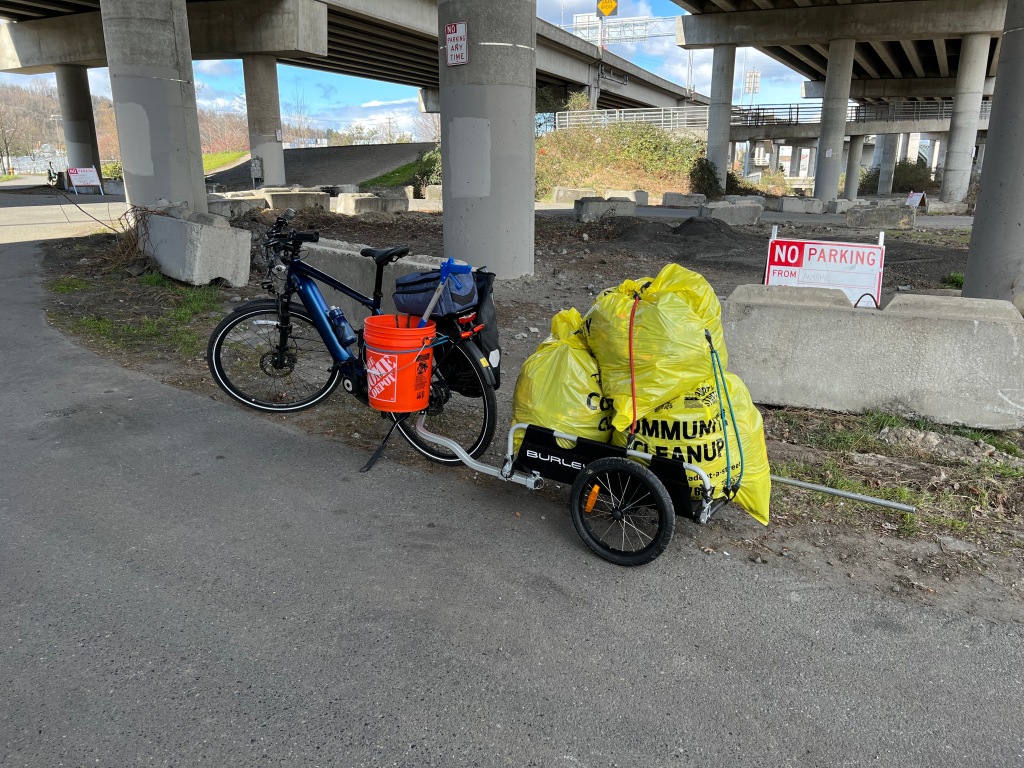
On any non-cargo bike, you’ll also almost certainly want to have a trunk bag and pannier carriers (or a rear rack). I find that I can strap a 5-gallon bucket to my rear rack very nicely and it doesn’t interfere with the trailer hitch (whereas a pannier on that side does).
I have also modified my bike with a Rohloff Speedhub internal gear hub, partly to have lower gears available for hill climbing with a heavy trailer, but that is certainly not required.
ABUS Pro Tectic 4960 lock
The ABUS Pro Tectic 4960 lock is a good “cafe lock” to quickly lock the rear wheel when you walk away from the bike to keep your bike safe from “grab and go” theft. On a cleanup rig, it’s handy to quickly lock the bike up without anything to lock it to (although a heavy trailer loaded with trash also discourages theft). However, a much more important (and invaluable) use for it is as a parking brake so that you can park the bike and trailer combination on a (reasonable) hill and be able to walk away from it as you pick up litter, and keep it from rolling away as you load the trailer.
Ortlieb Back-Roller waterproof panniers
I have a pair of Ortlieb Back-Roller waterproof panniers, and I keep the right-side one loaded up with various cleanup supplies so it’s usually ready to go. I generally carry the cleanup bags, extra gloves (for myself when I get my gloves wet or gross, and to lend out), a sharps container, extra straps and bungees, any any other small tools. I can also store extra clothing in the pannier, which is handy. They are waterproof so your supplies and clothes don’t get soaked.
Burley Nomad trailer with cargo rack
The Burley Nomad is probably the most versatile trailer for general cleanup work, especially with the Cargo Rack accessory. It is covered so that you can load it loosely with tools and not need to strap anything down inside it, which is great. It’s also nice to keep the rain off the contents, such as batteries and power tools that may not appreciate being left in the pouring rain. The cover may also keep passers-by from pilfering anything inside. The cargo rack accessory provides a nice flat (or angled) area with tubes that are handy to strap down trash bags, tools, and anything else you need to carry. While the Nomad trailer is very handy, its raw carrying capacity for trash and other junk is not that high.
I’ve modified my Nomad trailer so that I can tow the Flatbed trailer behind it, so that I can bring both trailers along.
Burley Flatbed trailer
The Burley Flatbed trailer is great for shuffling large amounts of heavy junk around. I can usually fit three fully loaded trash bags per trip on this trailer, and when correctly balanced, I can easily carry ~200 lbs (just don’t tell Burley, since the weight limit is only 100 lbs). The Flatbed trailer is, however, not great for carrying tools and supplies as you’ll have to strap everything down very carefully and tediously, or you’ll lose things on the street biking across town (ask me how I know).
Mr Tuffy tire liners
I use Mr Tuffy tire liners in my bike tires and all trailer tires. Especially since cleanup work necessarily means going to messy locations, and since Seattle has more than its fair share of road hazards anyway, these will keep you rolling most of the time instead of having to fix flats once a week. Hazards are mainly: broken glass, metal shards, broken-off needle tips, nails and screws, and sometimes thorns.
Gloves
You need comfortable and durable work gloves, possibly waterproof ones. Always use them. Bring several pairs. I use Milwaukee Performance Work Gloves from the selection at Home Depot.
Five gallon bucket
For any litter picking, a bucket is practically a requirement. It’s a huge pain to carry a bag around while picking, it’s awkward to get the trash into the bag, and it will quickly get heavier than you want to carry. You’ll also inevitably drag it across some blackberry brambles and tear a huge hole in it, spilling all the tiny litter you just picked up. Pick the litter into a five-gallon bucket and dump the bucket into the bag each time it’s full. I typically use an orange Home Depot bucket, but I need to get an unbranded one and put some stickers on it.
Garbo Grabber collapsible litter reacher tool
I use the Garbo Grabber collapsible litter reacher (provided for free by SPU) for picking up litter. There are a lot of variations of trash grabbers available for sale, but the Garbo Grabber ones provided for free by SPU are nicer than the ones I bought from Home Depot. Whenever possible, don’t pick up trash by hand. Use a trash grabber. Needles can hide under or inside of trash. (Besides that, it’s often kinda gross, and you’ll want it at arms’ length anyway.)
Sharps container
If you’re litter picking in Seattle, you’re unfortunately absolutely going to find hypodermic needles (with blood and drug residues), razor blades, and other similar sharp things. You can get sharps containers from SPU with your other Adopt-a-Street supplies. If you’re comfortable doing so, I would encourage you to collect them and dispose of them properly to keep kids, dogs, and bike tires from finding them. In general, it’s not a big deal: bring a sharps container along, and use the trash grabber to pick up each needle individually and drop it into your sharps container. Once the container is full, dispose of it properly using the City of Seattle Sharps Collection Program.
If you’re not comfortable doing this, I understand. You can leave them in place, and ideally report them through the Find It Fix It app.
Hand broom and dustpan
A decent interlocking (for storage and keeping track of both parts) hand broom and dustpan is invaluable for cleaning up broken glass on sidewalks and bike paths. You probably don’t want to bring the one you use in the house, so it’s a good idea to get a dedicated one.
Flat square shovel
A flat square shovel is very useful for scraping up things from the sidewalk: mud, moss, etc., as well as sorting through trash on the ground (or even shoveling it up into a bag). I like this DeWalt 49-inch version, but anything you’re happy with works fine.
Rugg Leaf Scoops
A handy tool is the Rugg Leaf Scoops (provided for free by SPU), which allow you to pick up a large quantity of leaf litter for bagging. If you’re doing a substantial amount of leaf cleanup work, a pair of leaf grabbers like these is essential. Many people also find that a snow shovel is quite useful for this task.
DeWalt 60V MAX FlexVolt leaf blower
I have the DeWalt 60V MAX FlexVolt leaf blower and it’s pretty good. This is useful for blowing leaves, of course, but also sticks, seeds, and gravel. I use it a lot, and it almost always comes in handy.
DeWalt 20V MAX 22″ hedge trimmer
I have the DeWalt 20V MAX 22″ hedge trimmer for cutting back blackberries and similar. This is very useful for clearing overgrown sidewalks.
DeWalt 20V MAX reciprocating saw and blades
I have the DeWalt 20V MAX reciprocating saw for cutting trees and branches too large for the hedge trimmer. Usually when clearing overgrown sidewalks we’ll have to break this out at least a few times. It’s also useful for cutting up downed branches (or even entire trees) so that they can be moved. You’ll also need some decent pruning blades for it, such as these Diablo 9-inch pruning blades, but whatever works.
DeWalt 60V batteries
I have 7 of the DeWalt FlexVolt 20V/60V MAX 9.0 Ah battery and carry a few of them as needed in a separate bag. Especially if you intend to use the leaf blower for anything substantial, you’re going to need multiple batteries (each 9 Ah battery lasts about 15 minutes at full power). I got the specific tools that I did to maximize battery sharing; they all use the same batteries.
Collection of bungees and straps
You will need a bunch of bungees and straps to attach everything to the trailers, and to be able to move trash and other junk around efficiently without it falling off. There’s an art to strapping things down and you’ll get the hang of it eventually. I usually carry and use around 7-8 bungees of different lengths, and a couple of Husky 1 in x 8 ft lashing straps. (I’ve found that ratchet straps are too cumbersome to use for this purpose, but they do work.)
GearLight S400 Pro front and rear lights
I use the GearLight S400 Pro front and rear lights in various flashing modes when I have my bike parked on the sidewalk or near the bike path to notify oncoming people that I’m around and working. It also likely notifies potential thieves that I am around and the bike wasn’t just left there.
Find an area in need
I bike around Seattle every day to exercise, explore the city, and as my daily transportation, which means that I end up seeing a lot of areas up close. I’ll often mentally note an area in need to come back to later. When I am out doing one cleanup, I inevitably stumble upon several more. I keep a spreadsheet.
I am not usually looking for massive cleanups, but something where I can make a difference as an individual cleaning up solo, but that’s just me, as I am pre-planning-averse. I focus on areas where accessibility or safety is clearly compromised, or where a problem is likely to escalate. I often work in “less loved” neighborhoods such as SODO and Georgetown. I also try to keep my “home” streets such as Highland Park Way SW clean and accessible.
Find a community (optional, but fun!)
There are a few groups out there doing cleanup work, such as Seattle Street Fixers (@SEAStreetFixers on Twitter). It can be a lot of fun to meet like-minded people and do some work together to make a bigger difference. There are, however, groups which might be doing something in a way that you don’t agree with or doesn’t match your goals. Be sure the group matches your expectations and feel free to bail out of groups that go in a direction you don’t agree with.
Do the cleanup work
I usually start in the morning on weekends, load up the bike and head out to the work area. Upon arrival, park the bike to the side somewhere (but not far away), lock the cafe lock, come up with an overall plan for the day, and set to work. If I am primarily litter-picking I’ll usually walk with a five-gallon bucket in my left hand and trash grabber in my right, picking up as I go and dumping the bucket into bags. I’ll generally leave the bags as they get full (ideally in pairs though). As I walk, I’ll also move bulky items near to the curb/path so I can come back for them easily and not forget about them.

Once I’m done for the day (or sometimes mid-day as well), round up all the bags and other junk at a single collection point (more on that below). I usually shuttle bags and junk in several trips using the bike trailer until everything is rounded up in one place.
Create a pile and report your cleanup for pickup
If you’re working with Seattle Public Utilities Adopt-a-Street program, you can (and should!) report your cleanup on their website.
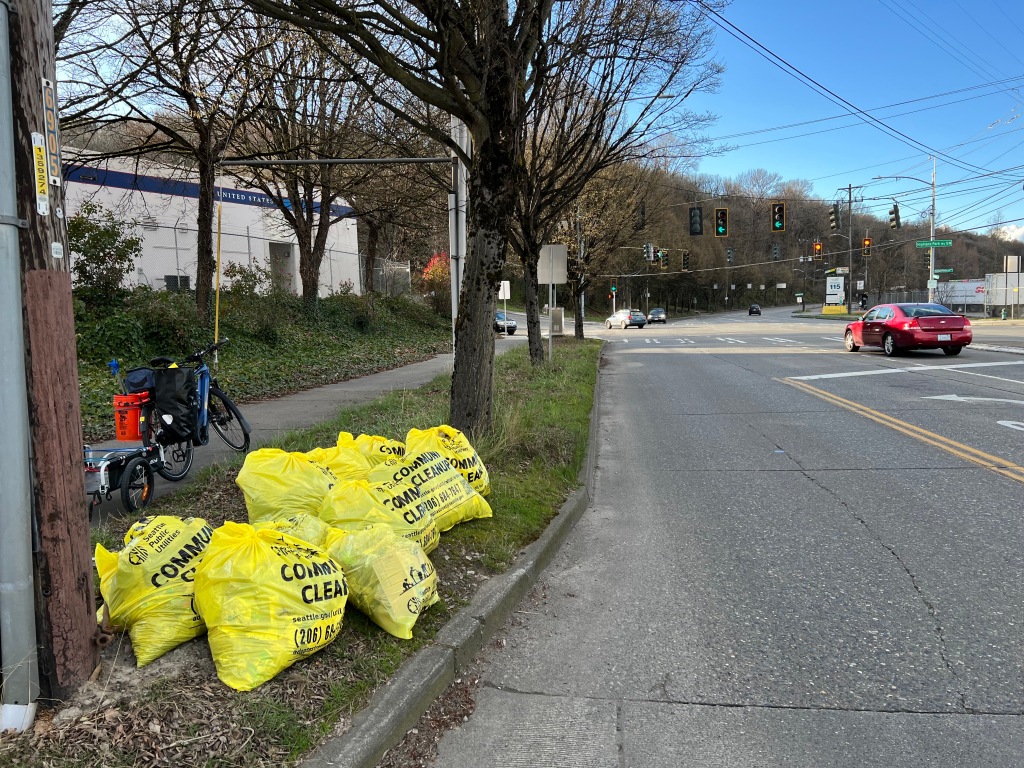
To make things as easy as possible and ensure a quick pickup, make a single pile of everything you collected, and I’ve found the following formula works well:
- Do not block the sidewalk, bike lanes, crosswalks, or any other accessible infrastructure!
- Choose a spot near a major intersection, but not at the intersection. Keep in mind that a potentially large truck will need to stop near the pile and load everything.
- Place everything at the edge of the roadway so that it’s visible from both sides of the street and can be easily located.
- Use the bright yellow Adopt-a-Street bags so that they are very visible, place them up front, and make it obvious to the driver that your pile is the one that was reported for Adopt-a-Street pickup.
- Place everything on public property: planting strips, near tree wells, or on the sidewalk space (if possible without blocking anything).
- If you must block or impair something, block the roadway rather than the sidewalk.
- For the sake of cost efficiency in the Adopt-a-Street program, try to create just one pile (the bike trailer is nice for this because it’s really not painful to move things even quite long distances), but don’t kill yourself to do that. Just try not to leave five piles of two bags each for pickup… that will cost the city five times as much.
- Make sure nothing can blow away: put or other heavy items on top of lighter items such as signs and cardboard.
Don’t forget to take a few pictures, both for the cleanup/pickup report and to tell people about it! (And if there’s any question about the pickup location, you can refer to the location the picture was taken and any landmarks you can see in the photo.)
Here are a few exemplary locations:


Tell people about it!
Write on Twitter, Facebook, Instagram, etc., and tell people about the awesome work you’re doing. It helps to get some encouragement from others, of course, but it also encourages others to get out and help as well. Mention your local Adopt-a-Street agency, tag your city name, and engage with others to encourage engagement. I frequently post on Twitter as @jeremycole about my cleanup efforts around Seattle.
When you see someone, say something… or help!
If you’re out somewhere and see someone cleaning up, feel free to stop by and say “hi”, offer your support, or even offer a helping hand. It’s really great to hear kind words of support. If you’re in a car, don’t honk though, as it’s very startling to a pedestrian, and a car driving at 150% of the speed limit honking in support as they speed by isn’t exactly… encouraging.
This is so heartening!
Thank you for your work.